> ## Documentation Index
> Fetch the complete documentation index at: https://daehan-base.mintlify.site/llms.txt
> Use this file to discover all available pages before exploring further.
# 결제 수락
> pay() 헬퍼와 Base Pay 버튼으로 앱에 원탭 USDC 결제를 추가하는 방법을 알아보세요.
export const SignInWithBaseButton = ({colorScheme = 'light'}) => {
const isLight = colorScheme === 'light';
return ;
};
export const BasePayButton = ({colorScheme = 'light'}) => {
const isLight = colorScheme === 'light';
return ;
};
## Base Pay를 사용하는 이유
Base의 USDC는 몇 초 만에 정산되고 가스 비용이 매우 저렴한 완전 지원 디지털 달러입니다. Base Pay를 사용하면 단 한 번의 클릭으로 이 달러를 수취할 수 있습니다. 카드, 환전 수수료, 차지백이 없습니다.
* **모든 사용자가 결제 가능** – 기본적으로 모든 Base Account(스마트 지갑)에서 동작합니다.
* **USDC, 가스 불필요** – 달러로 청구하며 가스 후원은 자동으로 처리됩니다.
* **빠름** – 대부분의 결제가 Base에서 2초 이내에 확인됩니다.
* **잔액 보유 어카운트** – 사용자가 Base Account 또는 Coinbase Account의 USDC로 결제합니다.
* **추가 수수료 없음** – 전액을 수취합니다.
**브랜드 가이드라인을 준수해 주세요**
BasePayButton을 사용하려면 애플리케이션 전반의 일관성을 위해 Base 브랜드 가이드라인을 준수해 주세요.
## 클라이언트 측 (브라우저 SDK)
**인터랙티브 플레이그라운드:** 앱에 연동하기 전에 [Base Pay SDK Playground](https://base.github.io/account-sdk/pay-playground)에서 `pay()`와 `getPaymentStatus()` 함수를 직접 실험해보세요.
```ts Browser (SDK) theme={null}
import { pay, getPaymentStatus } from '@base-org/account';
// Trigger a payment – user will see a popup from their wallet service
try {
const payment = await pay({
amount: '1.00', // USD amount (USDC used internally)
to: '0xRecipient', // your address
testnet: true // set false for Mainnet
});
// Option 1: Poll until mined
const { status } = await getPaymentStatus({
id: payment.id,
testnet: true // MUST match the testnet setting used in pay()
});
if (status === 'completed') console.log('🎉 payment settled');
} catch (error) {
console.error(`Payment failed: ${error.message}`);
}
```
**중요:** `getPaymentStatus()`의 `testnet` 파라미터는 원래 `pay()` 호출에서 사용한 값과 일치해야 합니다. `testnet: true`로 테스트넷에서 결제를 시작했다면, 상태 확인 시에도 `testnet: true`를 전달해야 합니다.
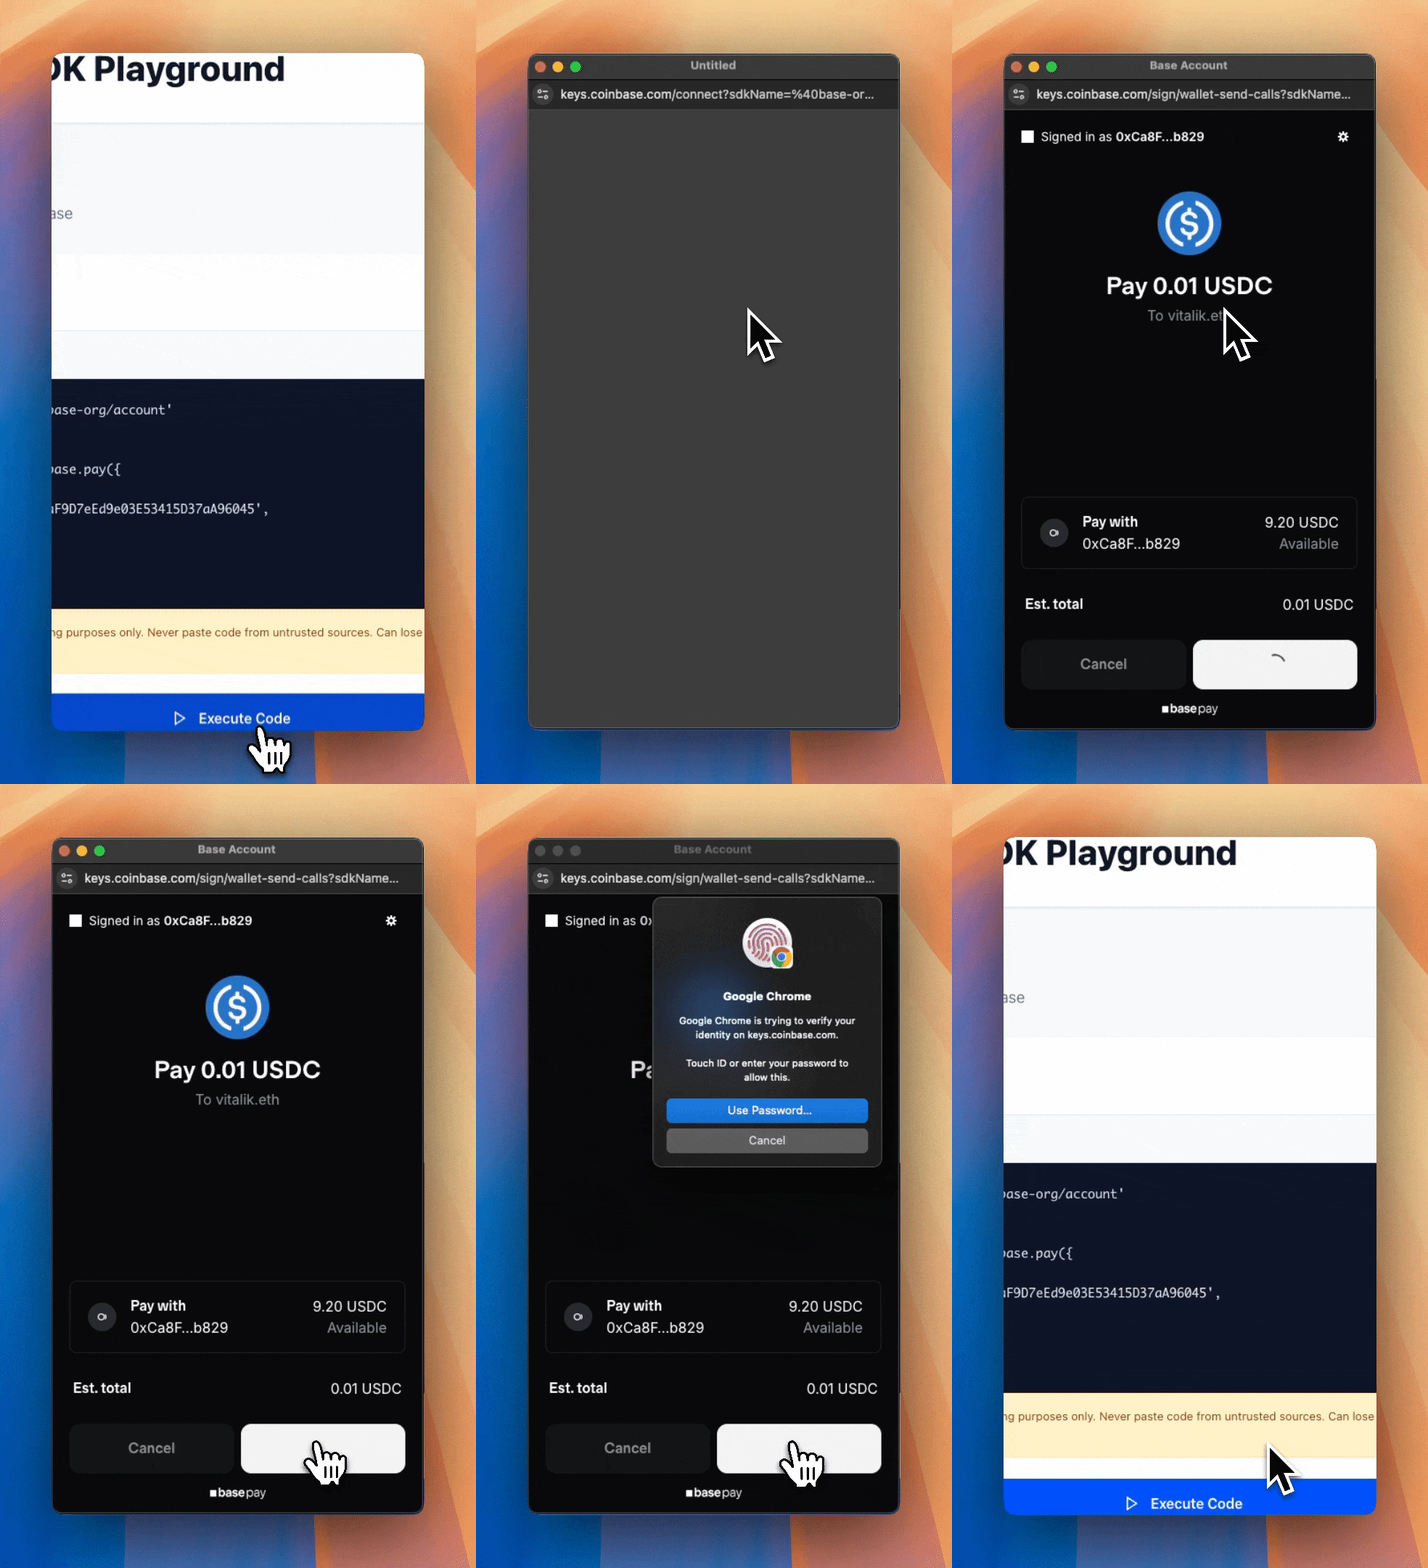
사용자가 결제 요청을 받으면 다음과 같이 표시됩니다:
### 사용자 정보 수집 (선택 사항)
결제 시 이메일, 전화번호, 배송 주소가 필요한가요? payerInfo 객체를 전달하세요:
```ts theme={null}
try {
const payment = await pay({
amount: '25.00',
to: '0xRecipient',
payerInfo: {
requests: [
{ type: 'email' },
{ type: 'phoneNumber', optional: true },
{ type: 'physicalAddress', optional: true }
],
callbackURL: 'https://your-api.com/validate' // Optional - for server-side validation
}
});
console.log(`Payment sent! Transaction ID: ${payment.id}`);
// Log the collected user information
if (payment.payerInfoResponses) {
if (payment.payerInfoResponses.email) {
console.log(`Email: ${payment.payerInfoResponses.email}`);
}
if (payment.payerInfoResponses.phoneNumber) {
console.log(`Phone: ${payment.payerInfoResponses.phoneNumber.number}`);
console.log(`Country: ${payment.payerInfoResponses.phoneNumber.country}`);
}
if (payment.payerInfoResponses.physicalAddress) {
const address = payment.payerInfoResponses.physicalAddress;
console.log(`Shipping Address: ${address.name.firstName} ${address.name.familyName}, ${address.address1}, ${address.city}, ${address.state} ${address.postalCode}`);
}
}
} catch (error) {
console.error(`Payment failed: ${error.message}`);
}
```
지원되는 요청 타입:
| type | 반환값 |
| ---------------------------- | --------------------------------------- |
| email | string |
| name | \{ firstName, familyName } |
| phoneNumber | \{ number, country } |
| physicalAddress | 이름, 주소, 도시, 주/도, 우편번호, 국가가 포함된 전체 주소 객체 |
| onchainAddress | string |
기본적으로 필수 항목입니다 — 사용자가 거부할 경우 결제가 중단되지 않으려면 optional: true로 설정하세요.
**사용자 정보를 검증하는 방법은?**
`callbackURL`을 사용하여 서버 측에서 사용자 정보를 검증할 수 있습니다.
`callbackURL`은 위 예시처럼 결제 완료 후 수집된 정보를 서버에서 검증하는 엔드포인트로 구현하면 됩니다.
## 서버 측
결제를 수락할 때 백엔드에서는 프론트엔드로부터 받은 트랜잭션과 사용자 정보를 검증해야 합니다. 이 섹션에서는 두 가지 중요한 측면을 다룹니다: 트랜잭션 완료 검증과 사용자 정보 유효성 검사.
### 사용자 트랜잭션 검증
주문을 이행하기 전에 `getPaymentStatus()`를 백엔드에서 사용하여 결제가 완료되었는지 확인하세요. 프론트엔드의 결제 확인만 믿지 마세요.
```ts Backend (SDK) theme={null}
import { getPaymentStatus } from '@base-org/account';
export async function checkPayment(txId: string, testnet = false) {
const status = await getPaymentStatus({
id: txId,
testnet // Must match the testnet setting from the original pay() call
});
if (status.status === 'completed') {
// fulfill order
}
}
```
**재생 공격 및 사칭 공격 방지**
* **재생 공격:** 악의적인 사용자가 동일한 유효한 트랜잭션 ID를 여러 번 제출할 수 있습니다. 항상 데이터베이스에서 처리된 트랜잭션 ID를 추적하세요.
* **사칭 공격:** 악의적인 사용자가 자신의 주문을 이행하기 위해 다른 사람의 트랜잭션 ID를 제출할 수 있습니다. 항상 결제 발신자가 인증된 사용자와 일치하는지 확인하세요.
두 가지 공격 벡터를 모두 방지하는 예시:
```ts Backend (with replay protection) expandable theme={null}
import { getPaymentStatus } from '@base-org/account';
// Example using a database to track processed transactions
// Replace with your actual database implementation (PostgreSQL, MongoDB, etc.)
const processedTransactions = new Map(); // In production, use a persistent database
export async function verifyAndFulfillPayment(
txId: string,
orderId: string,
payerAddress: string, // From authenticated user (SIWE, JWT, etc.)
testnet = false
) {
// 1. Check if this transaction was already processed
if (processedTransactions.has(txId)) {
throw new Error('Transaction already processed');
}
// 2. Verify the payment status on-chain
const { status, sender, amount, recipient } = await getPaymentStatus({
id: txId,
testnet
});
if (status !== 'completed') {
throw new Error(`Payment not completed. Status: ${status}`);
}
// 3. Verify the payment sender matches the authenticated user
// This prevents a malicious user from claiming someone else's payment
if (sender.toLowerCase() !== payerAddress.toLowerCase()) {
throw new Error('Payment sender does not match authenticated user');
}
// 4. Validate the payment details match your order
// This ensures the user paid the correct amount to the correct address
const expectedAmount = await getOrderAmount(orderId);
const expectedRecipient = process.env.PAYMENT_ADDRESS;
if (amount !== expectedAmount) {
throw new Error('Payment amount mismatch');
}
if (recipient.toLowerCase() !== expectedRecipient.toLowerCase()) {
throw new Error('Payment recipient mismatch');
}
// 5. Mark transaction as processed BEFORE fulfilling
// Store sender for easy lookup (e.g., to query all payments from a user)
// In production, use a database transaction to ensure atomicity
processedTransactions.set(txId, {
orderId,
sender,
amount,
timestamp: new Date()
});
// 6. Fulfill the order
await fulfillOrder(orderId);
return { success: true, orderId, sender };
}
```
**트랜잭션 추적을 위한 데이터베이스 권장 사항:**
* 트랜잭션 ID, 주문 ID, 발신자 주소, 금액, 타임스탬프, 이행 상태를 저장하세요
* 중복 방지를 위해 트랜잭션 ID에 고유 제약 조건을 사용하세요
* 빠른 조회를 위해 트랜잭션 ID에 인덱스 추가를 고려하세요
### 사용자 정보 검증
결제 시 사용자 정보(이메일, 전화번호, 배송 주소)를 수집하는 경우, `callbackURL` 파라미터를 사용하여 트랜잭션 제출 전에 서버 측에서 이 데이터를 검증하세요.
콜백 엔드포인트는 사용자 정보를 받아 성공 또는 오류 응답으로 응답해야 합니다:
```ts Backend (validation endpoint) theme={null}
export async function POST(request: Request) {
const requestData = await request.json();
const { requestedInfo } = requestData.capabilities.dataCallback;
const errors: Record = {};
// Validate email
if (requestedInfo.email) {
const blockedDomains = ['tempmail.com', 'throwaway.com'];
const domain = requestedInfo.email.split('@')[1];
if (blockedDomains.includes(domain)) {
errors.email = 'Please use a valid email address';
}
}
// Validate shipping address
if (requestedInfo.physicalAddress) {
const addr = requestedInfo.physicalAddress;
const supportedCountries = ['US', 'CA', 'GB'];
if (!supportedCountries.includes(addr.countryCode)) {
errors.physicalAddress = {
countryCode: 'We currently only ship to US, Canada, and UK'
};
}
}
// Return errors if validation failed
if (Object.keys(errors).length > 0) {
return Response.json({ errors });
}
// Success - return the request to proceed with the transaction
return Response.json({ request: requestData });
}
```
콜백은 트랜잭션 제출 **전에** 호출됩니다. 오류를 반환하면 사용자에게 정보를 수정하라는 메시지가 표시됩니다. 성공을 반환하면 트랜잭션이 진행됩니다.
콜백 요청/응답 형식과 지원되는 데이터 타입은 이 페이지의 예시 payload와 표를 기준으로 구현하세요.
## Base Pay 버튼 추가
네이티브 룩앤필을 위해 사전 제작된 컴포넌트를 사용하세요:
```tsx title="Checkout.tsx" theme={null}
import { BasePayButton } from '@base-org/account-ui/react';
import { pay } from '@base-org/account';
export function Checkout() {
const handlePayment = async () => {
try {
const payment = await pay({ amount: '5.00', to: '0xRecipient' });
console.log(`Payment sent! Transaction ID: ${payment.id}`);
} catch (error) {
console.error(`Payment failed: ${error.message}`);
}
};
return (
);
}
```
전체 props 및 테마 옵션은 `@base-org/account-ui/react` 패키지의 `BasePayButton` 컴포넌트 타입과 이 페이지의 예시를 참고하세요.
**브랜드 가이드라인을 준수해 주세요**
BasePayButton을 사용하려면 애플리케이션 전반의 일관성을 위해 Base 브랜드 가이드라인을 준수해 주세요.
## Base Sepolia 테스트
1. Circle Faucet에서 테스트 USDC를 받으세요 ("Base Sepolia" 선택).
2. `pay()`와 `getPaymentStatus()` 호출에 testnet: true를 전달하세요.
3. Sepolia BaseScan에서 트랜잭션을 확인하세요.